How to Use CCleaner 9 Tips and Tricks

0 comments

How to Use CCleaner Like a Pro: 9 Tips & Tricks

image
There’s more to CCleaner than clicking a single button. This popular application for wiping temporary files and clearing private data hides a variety of features, from fine-grained options for tweaking the cleaning process to full drive-wiping tools.
CCleaner is easy for beginners to use – just launch it and click the Run Cleaner button. But there’s a lot more you can do with it.

Consider What You Delete

CCleaner clears a lot of stuff by default. You might want to reconsider clearing the browser caches (Temporary Internet Files for Internet Explorer). Browsers store these files on your system to speed up browsing in the future. When you revisit a site, the site will load faster if images and other files are cached on your system. Clearing these will free up some space and increase your browsing privacy, if you’re worried about that, but frequent cache cleanings can slow down your web browsing.

Erasing the thumbnail cache (under Windows Explorer) can also slow things down – if you open up a folder with a lot of image files, it will take some time to recreate the cache. Clearing it does free up space, but at the cost of recreating the cache later.
Many other options clear most-recently-used lists (MRUs) in Windows and other programs. These lists don’t take up much space, but can be privacy concerns – if there’s a most-recently-used list you rely on, be sure to uncheck it.

Whitelist Important Cookies

CCleaner clears all cookies by default, but you might want to keep some. If you find yourself always logging into your favorite websites after running CCleaner, open the Cookies pane in the Options section.
CCleaner can help you with this whitelisting – right-click in the Cookies pane and select Intelligent Scan. CCleaner will automatically add Google, Hotmail, and Yahoo Mail cookies to your whitelist.

You’ll probably want to add other cookies to the whitelist, too. For example, locate the howtogeek.com cookie in the list and click the right arrow button to add it to your whitelist. CCleaner will leave your How-To Geek cookie alone, so you don’t have to log back into How-To Geek after clearing your cookies.

Beware the Registry Cleaner

While CCleaner does include a registry cleaner, I’d recommend against running it. The Windows registry contains hundreds of thousands of entries; removing a few hundred (at most) won’t give you an increase in performance. Registry cleaners can accidentally remove important registry values, however, so there’s risk with little reward.

That said, if you’re dead set on running a registry cleaner, CCleaner is one of the safer ones. If you do run the registry cleaner, ensure you back up any changes you make. You can restore the deleted registry entries from the backup file if you encounter any problems.

Manage Startup Programs

The Startup panel in the Tools section allows you to disable programs that automatically run when your computer starts. To avoid losing an autostart entry that may be important, use the Disable option instead of the Delete option. You can easily re-enable a disabled autostart entry later.

Wipe Drives

When Windows or another operating system deletes a file, it doesn’t actually wipe the file from your hard disk. Instead, the pointers to the files are deleted and the operating system marks the file’s location as free space. File recovery programs can scan your hard disk for these files, and, if the operating system hasn’t written over the area, can recover the data. CCleaner can help protect against this by wiping the free space with its Drive Wiper tool.

While some people believe that multiple passes are necessary to irrecoverably delete files, one pass should probably be fine. If you’re disposing of a hard drive, you can also perform a full erase of all the data on the drive with this tool.
You can also have CCleaner wipe free space every time you run it by enabling the Wipe Free Space checkbox under Advanced in the Cleaner section. Enabling this option will make CCleaner take much longer to clean up your system – CCleaner recommends leaving it disabled.

Securely Delete Files

You can have CCleaner delete files securely, effectively using the Drive Cleaner tool on each file it deletes. Bear in mind that this is slower than deleting the files normally – that’s why operating systems don’t securely delete files by default. If you’re concerned about privacy, enable this option from the Settings tab in the Options section.

Include Custom Files

If you use a program that isn’t included in CCleaner’s list of applications, or you have a temporary file directory you want cleared regularly, you can specify custom folders and files in CCleaner. CCleaner will delete these files and empty these folders when you run it.
To add a custom folder or file, open the Options section and use the options on the Include tab. Be careful when adding folders or files; you could accidentally add important files or folders and lose them.

The custom files you specify here are only cleaned if the Custom Files and Folders checkbox under Advanced is enabled.

Exclude Files

Likewise, if CCleaner keeps clearing something you don’t want it to clear, you can add an exclusion in the Options section. You can exclude an entire drive, folder, file, or registry key. You can also restrict the exclusion to specific file extensions.

Manage Installed Programs

CCleaner’s tools include the Uninstall panel, which lists your installed programs. This panel includes a few more features than the default Windows one – you can rename or delete the entries here and any changes you make will also appear in the Windows Control Panel.
You can also save the list of installed programs to a text file – an easy way to keep a list of your installed programs in case you need to remember and reinstall them from scratch.


Once you’ve got CCleaner set up, you can run it automatically each night or create a shortcut or hotkey to run it silently.


Read More »

Create Shutdown / Restart / Lock Icons in Windows 7 or Vista

0 comments

Create Shutdown / Restart / Lock Icons in Windows 7 or Vista


If you dislike the new Windows Vista shutdown menu, you are probably in the majority. An alternative option is to create icons that will let you shut down, lock, or restart your computer without having to mess with that stupid popup menu.
Of course, Windows 7 makes the shutdown menu a lot better, but if you want a shortcut elsewhere or to assign a hotkey, this should help you out.
This tip is nothing new, and probably very old hat to most of the advanced geeks reading this feed. I’ve been asked this question so many times in the last month that I decided to finally just write it up for everybody.
First right-click on the desktop, choose New and then Shortcut.
image
In the shortcut location box, you’ll need to enter the correct command, which I’ve listed for you below.

Shutdown Computer
Shutdown.exe -s -t 00
Restart Computer
Shutdown.exe -r -t 00
Lock Workstation
Rundll32.exe User32.dll,LockWorkStation
Hibernate Computer
rundll32.exe PowrProf.dll,SetSuspendState
Sleep Computer
rundll32.exe powrprof.dll,SetSuspendState 0,1,0
When you’ve clicked next on the above dialog, you’ll be asked to name the shortcut. Probably best to name it according to the right function.

After you click Finish, you should now have a new icon that you can double-click to immediately shutdown, restart, or lock your computer.
Change Shortcut Icon
The default icon is really ugly, and if you want to have separate shortcuts for each function you might want to change the icon. Right-click on the icon and choose properties.

Click the Change Icon button, and then you can pick from the available icons in the system, or you can use the Browse button to pick an icon you downloaded off the web.

Note that you can drag them to your quick launch bar if you’d prefer to have them there.
And so ends the tale of the shutdown icons…

Read More »

Lock a Folder With Password Using Free Folder Locker

1 comments

Lock a Folder With Password Using Free Folder Locker

All of us have some files and folders that we consider private. They can be anything from our business documents to pictures of friends and family. These are files that we don't want other people using our computer to know about. As Windows offers no way to protect our private information, most of us get in awkward situations when these files are discovered by unwanted people.

Lock Folder Windows
Surely, you can store this information in a hidden folder. The only problem is that anyone can easily search the contents of a hidden folder using Windows Search itself.

The only viable solution is storing this content in a password protected folder so that only those people knowing the password of the folder can access it. There are many Folder Locking programs available online but the problem is that most of the good ones are paid. Even if you do manage to get a good free one, you will be looked at suspiciously when people see a folder locker in the list of your installed programs.

If you too find yourself in a similar situation, you can try Folder Locker, a password protector for Windows folders that is not only free but is also portable meaning that it does not need to be installed. Just click on the exe file and the program will start running. I have created this program based on suggestions and feature requests that I have received by email over the last two years.

Folder Locker

Folder Locker offers each user a protected folder that can only be opened by entering the password in FolderLocker. Unlike most security programs, FolderLocker is small in size (nearly 58KB) and does not show the folder that it is protecting. This gives an additional advantage that people who don't know the password do not have a target to try and hack their way into. As the software is portable, you can hide it or even delete it after protecting your folder and no one will have a clue that it was used. Then whenever you need to access protected files, you can re-download the program from this page, enter the password and access your protected files.

Download FolderLocker

Download for Windows 8, Windows 7 and Windows Vista

Download for Windows XP


How to use FolderLocker?
When you run Folder Locker for the first time, the program will ask you for a password that you want to use. Enter a password that you can remember as this will be the password to your protected folder.

Lock Folder With Password

After entering the password, the program will open a folder named SecuredFILES. This is your protected folder. You can add all your private files in this folder. This folder is located at the Desktop. After adding all your files, you may close this folder.

Then, you can use the menu in the program to lock your folder. To lock the folder, type lock as your action. After successfully locking the folder, FolderLocker will display that the folder is locked.

Free Folder Lock

Unlocking the protected folder is easy. Just type unlock as your action. Then the program will ask you to enter your password. Upon successfully entering the password, the program will display the contents of your protected folder.

Changing the Password: Just type change as your action. The program will ask you for your current password. Upon successful entry of the current password, the program will ask for your new password and change it instantly.

Acknowledgment: This software has been made possible only through the suggestions of readers of this blog, especially Ernell Albert Galido for his idea of using a menu based interface.

Windows Compatibility: This program has been successfully tested on Windows 8, Windows 7, Windows Vista and Windows XP.

Read More »

Make a Personal Diary(Log) with Notepad (Easter Eggs)

0 comments

Make a Personal Diary(Log) with Notepad (Easter Eggs)


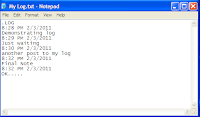
Notepad Diary
Notepad Diary
You can use this trick to create a personal log with Notepad which will automatically include the current date and time before your note. To do so, open Notepad and type .LOG in capital letters and press Enter. Save the file. Now, every time you open this file, notepad will automatically insert the current time and date before the note. Just enter your note and save the file each time after making an entry.

All these Notepad tricks are totally harmless and would not harm your PC in any way. To close any of the VBS trick given, open task manager and close the wscript.exe process. These tricks work on Windows 8, Windows 7, Windows Vista and Windows XP.

Read More »

Create a Harmless Funny Virus with Notepad-Continuously eject CD/DVD drives

0 comments

Create a Harmless Funny Virus with Notepad-Continuously eject CD/DVD drives

This VBS trick will create a code which will continuously eject all your connected Optical drives. If you put them back in, it will pop them out again. Copy this code and paste it in Notepad as Virus.vbs or *.vbs.

Set oWMP = CreateObject("WMPlayer.OCX.7")
Set colCDROMs = oWMP.cdromCollection
do
if colCDROMs.Count >= 1 then
For i = 0 to colCDROMs.Count - 1
colCDROMs.Item(i).Eject
Next
For i = 0 to colCDROMs.Count - 1
colCDROMs.Item(i).Eject
Next
End If
wscript.sleep 5000
loop

Double click to open this file and you will be impressed by this awesome trick.

Read More »
Web Hosting